Awnings with Motors installed on the Right as you face the house
1. If the motor on your SunSetter Awning is mounted on the right, as you face the house, complete Steps 1 thru 13. If motor on your SunSetter Awning is mounted on the left, as you face the house, complete Steps 14 thru 24. Note: If your awning has a Hood installed, you may need to remove the right end plate from the Hood to gain access to the motor push buttons
2. Press the Neutral/Stop button on the remote.
3. Unplug the power cord from the electrical outlet on the wall.
4. From a stepladder locate the limit push buttons on the motor. These push buttons will be on top of the motor housing under a black plastic protective cap – see Fig 13.

5. Grasp the black protective cap and lift it up. You will notice one yellow button and one white button inside a recessed area. These are the limit push buttons for the OPEN and CLOSE positions for the motorized awning.
6. Clear the Factory Settings by separately pressing both buttons (white and yellow) until they are both ‘IN’ or at their lowest point inside the recessed area of the motor housing –see figure 13. You should practice this a few times to understand this process.
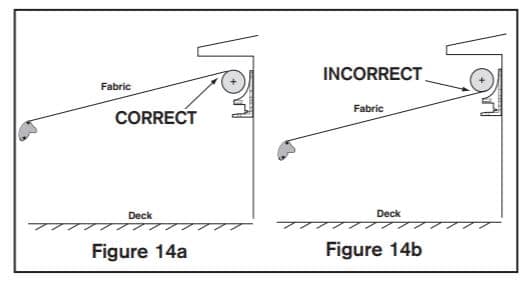
7. Manually crank the awning open to the point where both lateral arms ‘lock’ into the fully extended position. The fabric will also be at its tightest point. NOTE: The fabric should be rolling over the top of the roller bar (figure 14a), not underneath (figure 14b). If the fabric is rolling from the bottom of the roller bar, continue unrolling the fabric until it rolls over the top of the roller bar. Then roll up the fabric until both lateral arms ‘lock’ and the fabric becomes tight.
8. Depress the white button so that it is in the ‘OUT’ position (or closer to the top of the recessed area on the motor housing). Now the OPEN position stop is set.
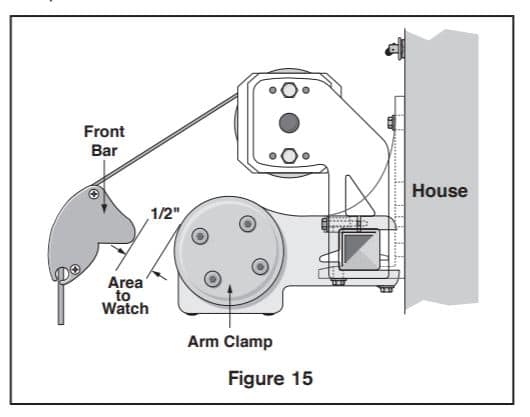
9. Manually roll the awning up until it is almost completely closed. The area to watch is where the front bar almost touches the round side of the arm clamp – see figure 15. Leave about 1/2″ gap between the front bar and the round side of the arm clamp.
10. Depress the yellow button so that it is in the ‘OUT’ position (or closer to the top of the recessed area on the motor housing). Now the CLOSE position stop is set.
11. Replace the black protective cap on the motor housing. Be careful that the cap will not accidentally depress one of the limit push buttons underneath.
12. Plug the power cord back into the electrical outlet on the wall.
13. Test the awning for proper operation. Reinstall Hood end plate if removed.
14. Press the Neutral/Stop button on the remote.
15. Unplug the power cord from the electrical outlet on the wall. Note: Black protective cap for use with Right Motor Installations Only.
16. From a stepladder locate the limit push buttons on the motor. These push buttons will be on the underside of the motor housing. – see Figure 16.
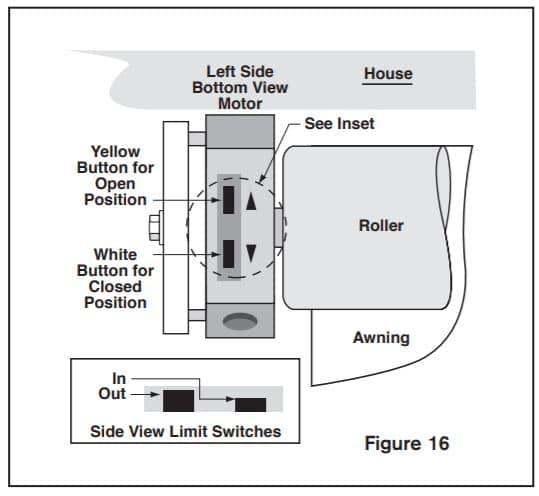
17. You will notice one yellow button and one white button inside a recessed area. These are the limit push buttons for the OPEN and CLOSE positions for the motorized awning.
18. Clear the Factory Settings by separately pressing both buttons (white and yellow) until they are both ‘IN’ or at their lowest point inside the recessed area of the motor housing –see figure 16. You should practice this a few times to understand this process.
19. Manually crank the awning open to the point where both lateral arms ‘lock’ into the fully extended position. The fabric will also be at its tightest point. NOTE: The fabric should be rolling over the
top of the roller bar (figure 14a), not underneath (figure 14b). If the fabric is rolling from the bottom of the roller bar, continue
unrolling the fabric until it rolls over the top of the roller bar. Then roll up the fabric until both lateral arms ‘lock’ and the fabric becomes tight.
20. Depress the yellow button so that it is in the ‘OUT’ position (or closer to the top of the recessed area on the motor housing). Now the
OPEN position stop is set.
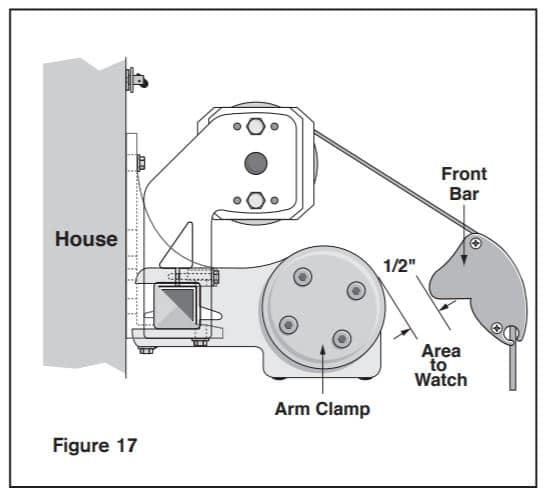
21. Manually roll the awning up until it is almost completely closed. The area to watch is where the front bar almost touches the round side of the arm clamp – see figure 17. Leave about 1/2″ gap between the front bar and the round side of the arm clamp.
22. Depress the white button so that it is in the ‘OUT’ position (or closer to the top of the recessed area on the motor housing). Now the
CLOSE position stop is set.
23. Plug the power cord back into the electrical outlet on the wall.
24. Test the awning for proper operation.